
This post may contain affiliate links. If you click on one of my affiliate links and make a purchase, I may receive a commission for referring you. This in no way affects your price. Please know that I only recommend resources and items I believe in and highly recommend. You can read my full disclosure statement here.
20 Water Science Activities for Kids – Exploring the Wonders of Water: Water is all around us, from the water we drink to the vast oceans, rivers, and lakes covering our planet. But did you know that water is also full of fascinating science waiting to be explored through hands-on experiments?
Imagine turning everyday water into an exciting learning experience! With hands-on experiments, kids can dive into the magic of molecules, uncover the mysteries of the water cycle, and explore concepts like density, surface tension, and buoyancy—all while having fun.
Whether you’re a homeschooling parent wanting to enrich your science curriculum or a caregiver searching for interactive activities, these 20 water science experiments will captivate young minds. Learning has never been this engaging—or this wet!
So, grab your lab coats and safety goggles, and get ready to make a splash with these fun, educational water science activities.
20 Water Science Activities for Kids
Water is one of the Earth’s most incredible resources, and it’s all around us. From the water we drink to the oceans, rivers, and lakes that cover our planet, water is essential for life. Teaching kids about the science of water can be not only educational but also a whole lot of fun. Whether you’re a homeschooling parent looking to incorporate exciting experiments into your curriculum or a caregiver searching for hands-on activities to keep the kids engaged and learning, these 20 water science activities will make a splash in your educational arsenal.
Get ready to embark on a watery adventure that will explore the magic of molecules, the wonders of the water cycle, and the captivating concepts of density, surface tension, and buoyancy. So, put on your lab coats, grab your safety goggles, and dive into the exciting world of water science with these 20 engaging activities for kids!
1. Magic Milk Experiment
The Magic Milk Experiment is a fun and easy way to explore surface tension using simple household items. Pour whole milk into a shallow dish and add a few drops of different food coloring around the surface. Then, dip a cotton swab or toothpick into dish soap and gently touch it to the milk. Instantly, the colors swirl and move as the soap breaks the surface tension, pushing the milk and dye around. This reaction happens because soap molecules disrupt the bonds in the milk’s fat, creating a mesmerizing explosion of color. Perfect for kids and science lovers alike, this experiment offers a hands-on way to learn about chemistry in action!

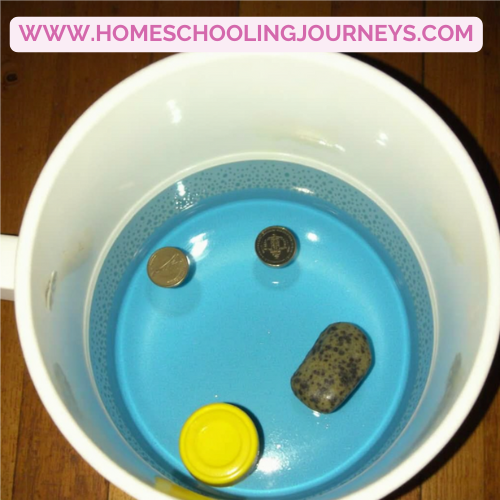
2. Floating and Sinking Water Science Challenge
The Floating and Sinking Water Science Challenge is a hands-on way to explore the concepts of density and buoyancy. Gather a variety of objects—such as a coin, a sponge, a plastic bottle cap, and a rock—and fill a container with water. Before dropping each item in, make a prediction: will it float or sink? Then, test your hypothesis by placing the object in the water and observing what happens. Objects that are denser than water will sink, while those with more air or lower density will float. This simple yet engaging experiment encourages critical thinking and scientific exploration, making it a perfect activity for curious minds!
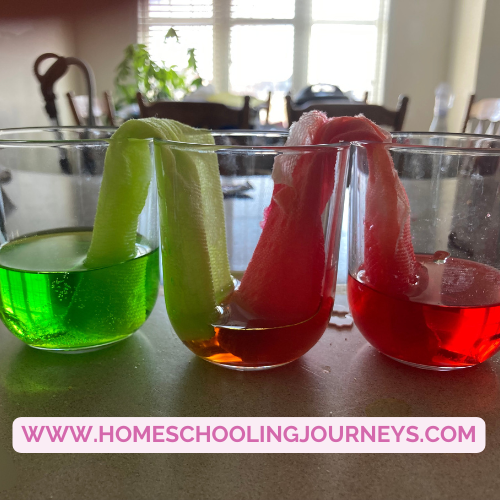
3. Walking Water Experiment
The Walking Water Experiment is a fascinating way to explore capillary action using simple household materials. Start by filling two clear cups with water and adding different food colors to each. Leave an empty cup between them. Roll up paper towels and place one end in the colored water and the other in the empty cup. Over time, the water “walks” up the paper towel and drips into the empty cup, mixing the colors as it moves. This happens because of capillary action, where water molecules cling to the paper towel fibers and pull upward. It’s a fun, visual way to learn about how plants absorb water and how liquids can move against gravity!
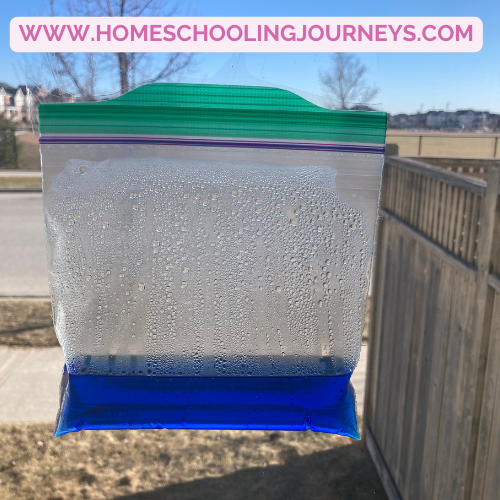
4. Water Cycle in a Bag
The Water Cycle in a Bag experiment is a simple and engaging way to observe how water moves through the environment. Fill a ziplock bag with a small amount of water and add a few drops of blue food coloring to represent a body of water. Seal the bag and tape it to a sunny window. As the sun heats the water, you’ll see evaporation occur as water vapor rises inside the bag. Over time, condensation forms as droplets on the cooler parts of the bag, mimicking clouds. Eventually, the droplets grow heavy and fall back down like precipitation. This easy experiment visually demonstrates evaporation, condensation, and precipitation in action, making the water cycle come to life!
5. Oil and Water Density Jar
The Oil and Water Density Jar is a fun and visual way to explore the concept of density. Start by pouring honey or corn syrup into a clear jar as the heaviest liquid, followed by water with a few drops of food coloring, and finally, oil on top. Since each liquid has a different density, they will separate into distinct layers, with the heaviest at the bottom and the lightest at the top. For extra fun, drop in small objects like a bead, a grape, or a paperclip to see where they settle based on their density. This experiment is a great way to introduce scientific principles in a hands-on and engaging way!
6. Water Surface Tension Experiment
The Water Surface Tension Experiment is a simple yet eye-opening way to explore the invisible forces at work in liquids. Fill a bowl with water and lightly sprinkle pepper across the surface. The pepper floats due to water’s surface tension, which creates a thin “skin” that holds it up. Now, dip your finger in dish soap and touch the water—instantly, the pepper scatters to the edges of the bowl! This happens because the soap breaks the surface tension, reducing the water’s ability to hold the pepper in place. It’s a quick and fascinating way to introduce kids to the science of surface tension and molecular interactions!
7. Lava Lamp Experiment
The Lava Lamp Experiment is a fun and colorful way to explore density and chemical reactions. Fill a clear jar or bottle about two-thirds full with oil, then add water until it’s nearly full—watch as the water sinks below the oil due to its higher density. Add a few drops of food coloring, which will pass through the oil and mix with the water. Now, drop in an effervescent tablet, like Alka-Seltzer, and watch as bubbles rise, carrying the colored water upward before sinking again, creating a mesmerizing lava lamp effect. The fizzing reaction releases carbon dioxide, which temporarily lifts the water before it falls back down, making this a fantastic hands-on experiment for learning about liquid properties and gas formation!
8. Leakproof Bag Experiment
The Leakproof Bag Experiment is a surprising and fun way to explore polymer science in action. Fill a sturdy ziplock bag about two-thirds full with water and seal it tightly. Then, carefully poke sharpened pencils straight through both sides of the bag—amazingly, no water leaks out! This happens because the plastic bag is made of polymers, long chains of flexible molecules that stretch and form a temporary seal around the pencils. The experiment is a great way to introduce kids to the properties of materials and how science can sometimes defy our expectations!
9. Ice Fishing Experiment
The Ice Fishing Experiment is a simple yet fascinating way to explore freezing points and melting. Fill a glass with water and add an ice cube. Lay a piece of string across the top of the ice, then sprinkle a little salt over it. Wait about 30 seconds, then gently lift the string—amazingly, the ice cube will stick to it! This works because salt lowers the freezing point of water, briefly melting the surface of the ice. As the water refreezes around the string, it traps it in place, allowing you to “catch” the ice. It’s a fun, hands-on way to learn about the science behind ice and temperature changes!
10. Dancing Raisins
The Dancing Raisins experiment is a fun and easy way to explore buoyancy and gas properties using simple household items. Fill a clear glass with carbonated water and drop in a few raisins. At first, they sink because they are denser than the liquid. However, as tiny carbon dioxide bubbles from the soda attach to the wrinkled surface of the raisins, they become buoyant and rise to the top. When the bubbles pop, the raisins lose their lift and sink again, creating a dancing effect. This experiment visually demonstrates how gas can change an object’s buoyancy and is a great way to introduce kids to the science of density and carbonation!
11. Water Absorption Test
The Water Absorption Test is a simple experiment that introduces the concept of permeability while comparing how different materials absorb water. Gather a variety of materials, such as a sponge, a paper towel, and a piece of fabric. Fill a shallow dish with water, and dip each material into the water for a few seconds, then lift it out and observe how much water it holds. You can even measure the amount of water absorbed by each material to make comparisons. This hands-on activity demonstrates how the structure of each material affects its ability to absorb liquid and helps kids understand the scientific principles of permeability in a fun and interactive way!
12. Color Mixing with Water
The Color Mixing with Water experiment is a fun way to introduce kids to the basics of color theory. Fill three clear cups with water and add a few drops of primary colors: red, blue, and yellow. Then, using separate cups, mix the colored waters together to create secondary colors—red and blue make purple, red and yellow make orange, and blue and yellow make green. This hands-on activity allows kids to see how different colors combine to form new hues, helping them understand the concept of primary and secondary colors in a simple, visual way. It’s an engaging introduction to both science and art!
13. Egg Floating Experiment
The Egg Floating Experiment is a simple and exciting way to explore how salt changes water’s density. Fill a clear glass with water and gently place an egg inside to see it sink to the bottom. Next, add salt to the water—start with a few tablespoons and stir until it dissolves. Carefully drop the egg back into the glass, and you’ll notice that it floats! This happens because the salt increases the water’s density, making it denser than the egg, which allows the egg to float. It’s a hands-on experiment that demonstrates the concept of density in an easy and fun way!
14. Soap Boat Race
A Soap Boat Race is a fun and simple way to explore concepts like propulsion and surface tension. To start, cut small boat shapes from foam, ensuring they are lightweight and can float on water. Place the boats on a shallow dish or tray filled with water, then add a drop of dish soap to the back of each boat. As the soap interacts with the water’s surface tension, it creates a force that pushes the boat forward, demonstrating the principle of propulsion. This hands-on activity is a great way to engage children in science while watching the boats race across the water!
15. Penny Water Drop Challenge
The Penny Water Drop Challenge is an engaging activity that helps demonstrate the concept of cohesion, or the attraction between water molecules. To start, place a penny flat on a surface and use an eyedropper to carefully add drops of water one by one onto the penny. As you continue to add drops, observe how the water forms a dome shape on the penny’s surface, with the drops sticking together due to cohesive forces. The goal is to see how many drops you can add before the water spills over. This simple experiment is a great way to introduce children to the fascinating properties of water and how molecules stick together.
16. Hot vs. Cold Water Diffusion
The Hot vs. Cold Water Diffusion experiment is a great way to illustrate how temperature affects the speed of molecular movement. To conduct this activity, fill two clear glasses with water—one with hot water and the other with cold water. Then, drop a small amount of food coloring into each glass and watch as the color spreads. In the hot water, the food coloring will quickly diffuse and spread out, while in the cold water, the diffusion will be slower. This experiment shows how higher temperatures increase molecular movement, causing faster diffusion, while colder temperatures slow it down, making it a perfect way to visualize this scientific principle.
17. Water Balloon Osmosis Experiment
The Water Balloon Osmosis Experiment is a hands-on way to explore the process of osmosis. To begin, fill two separate containers with water—one with fresh water and the other with salt water. Next, place a water balloon in each container and observe what happens over time. In the fresh water, the water inside the balloon will likely swell as it moves into the balloon through osmosis, seeking to balance the concentration of water inside and outside the balloon. In the salt water, the balloon will shrink as water moves out of the balloon to balance the higher concentration of salt outside. This simple experiment clearly demonstrates how osmosis works, with water moving from areas of low concentration to high concentration.
18. Melting Ice Exploration
The Melting Ice Exploration is a fun and educational activity that shows how different substances can affect the melting speed of ice. To conduct the experiment, start by placing several ice cubes on separate plates. On one plate, sprinkle salt, on another, sugar, and on the third, sand. Leave the plates at room temperature and observe which ice cube melts the fastest. Salt lowers the freezing point of water, causing the ice cube to melt quicker, while sugar and sand have different effects, with sand likely slowing the process due to its insulating properties. This experiment offers a hands-on way to explore how various substances influence the rate of melting, providing a clear understanding of how temperature and composition interact.
19. DIY Water Filter
The DIY Water Filter is an easy and effective way to introduce kids to the concept of water purification. To make the filter, you’ll need a plastic bottle, sand, gravel, and cotton balls. Start by cutting the bottom off the plastic bottle and turning it upside down. First, place a layer of cotton balls at the neck of the bottle to act as a fine filter. Then, add a layer of sand, followed by a layer of gravel, to help filter out larger particles. Pour dirty water through the filter and watch as it becomes cleaner, demonstrating how materials like sand and gravel can help remove impurities from water. This hands-on experiment is a great way to teach the importance of water filtration and environmental science.
20. Sink or Float with Fruits
The Sink or Float with Fruits experiment is a fun and interactive way to explore the concept of buoyancy. To start, gather a variety of fruits, such as apples, oranges, bananas, and grapes, and fill a large bowl or tub with water. Before placing each fruit in the water, predict whether it will sink or float. As you drop each fruit into the water, observe its behavior—some fruits will float, while others will sink. Discuss how air pockets inside the fruit affect its buoyancy, allowing fruits like apples and oranges to float due to their air-filled structure, while denser fruits like bananas might sink. This activity provides a hands-on opportunity to learn about how the density and composition of objects influence their ability to float or sink.
Water science is an incredible way to get kids excited about STEM. These activities offer hands-on learning experiences that encourage curiosity, observation, and critical thinking. Whether you’re experimenting with density, exploring the water cycle, or testing surface tension, there’s something for everyone to enjoy.
So, grab some water, get ready to explore, and let the learning begin!
Leave a Reply